History Graduate
Students – Web Profile Instructions
How it works
The website exists in two versions: an external version, visible to all the world, which can be found at http://www.princeton.edu/histgrads/, and a Development version, which can be edited and tested without making the changes available to external viewers. We use a 'Content Management System' called Roxen to manage this process and make editing of profiles consistent and, hopefully, easy. It is the same system that the History Department uses for the main history site.
Although each of us can create and make changes to our individual web profiles at any time, before these new profiles or changes can go live to the external site, the department has mandated that they need to be submitted to an approval system (called, in the lingo, a ‘Workflow’), where they will be checked over and approved by Lauren or Kristy. Since Lauren and Kristy can’t be expected to keep having to do this every time someone alters their information, this process will take 1 week (or occasionally 2), as the approvals will be done in batches. NB: To send your profile into the approval workflow, once you have finished editing it, it is essential that you 'Publish and Approve' it, or nothing will happen (or, if using the Content editor to manipulate your files directly, Commit it, and then Approve it). Instructions on this can be found below.
The development version of the site can be found at https://deptbedit.princeton.edu/histgrads/ . To edit, you log into it with your usual Princeton net id and password.
Below, you can find instructions on how to do the following
1) Check your Information that is currently visible, if you haven't already done so
Checking your information
The information used to generate the lists of students was based on data provided by Kristy (and originally used to generate the History website's horrible old student .pdfs, now a thing of the past). It has been processed a little to standardize things as much as possible. Please follow the steps below to check the information which applies to you and email Lauren or Kristy if you find errors. Also feel free to pass on any errors you see that do not relate to yourself. In particular, a few people who have defended and left may still be present in the tables.
- Find yourself in the alphabetical list
(you may need to log in with Princeton netID and
password) and check that your name is correct. Check that you email
address is correct.
- Inform me if you want to use a different, preferred
name for your departmental web identity than the one currently listed.
- Check you are in the correct cohort in the list of
students by
cohort.
- Finally, find your name on the main page's list of students by field
and check you are listed under the correct field. If your field is
incorrect and you wish to be placed under a different field heading,
please let me know. Note that some students (eg,
those who feature in the transnational/comparative section) may of
necessity be listed under more than one field, but we are trying to
minimize occurrences of this to avoid making the page too long or
confusing. The field headings are based on a reduced version of the
Department's own list of fields for admissions. They are a convenience for
organizing information on the website, and are not meant to reflect a
profound statement about the nature of the discipline of History. No
system for doing this is perfect, since obviously our sprawlingly
comprehensive discipline and its practitioners don't really always divide
up nicely into neat little subcategories, and it would be rather a shame
if they did. But people do need to be sorted somehow, and this seemed an
efficient way to do it.
Creating
a New Profile
Here, you will create and add content to you new profile. It will be invisible to others, but editable by you, until you ‘Publish and Approve it’ (‘Approve’ here means not the final approval of Kristy/Lauren but that you approve the profile to go to the next step of the ‘Approval workflow’. Yes, the Roxen system has a peculiar talent for confusing terminology.)
To comply with Princeton's Office of Communications, the website, including the student profiles, needs to be kept at some broad level of standardization. An uncharitable interpretation might read this as curbing, nay stifling, creativity. Perhaps. But the aim here is to convey certain kinds of academic and biographical information in a format that is fairly close to the format mandated for History faculty (for a faculty example, see here). If you find this horribly confining and want to fly outside this sinister bureaucratic iron cage and get really creative with your academic persona online, you should create your own website and link to it from your 'official' profile.
What this means in practice for the web profiles:
- Please, no excessively goofy photos, as I doubt Princeton’s
Office of Communications &c. shares our finely-developed graduate
student senses of humour. I know some of us
delight in goofiness: please curb it just this once or if you must, save
it and create a personal website which you'll be able to link to from your
profile and in which you can foster an unrestrained utopia of total
goofiness to represent your academic persona if such is your desire.
Non-goofy photos of you in interesting or even exotic places are obviously
no problem.
- Please try to keep to the standard template for
profiles that your new profile will have when it is created: basic
information on left, photo on the right, followed by paragraphs of text.
If you want to get supremely snazzy with web design, again I urge you to
create your own website and link to it.
Before
you start, you may want to have a look at an example of a fairly complete
student profile. There are many to be found by clicking around at http://www.princeton.edu/histgrads/
.
With all this in mind, to create your profile follow these steps:
- For best results, use a browser that is not Internet
Explorer, e.g. Firefox or Google Chrome. IE will still work, but your
content editing environment might be inferior.
- Point your web browser to https://deptbedit.princeton.edu/histgrads/profiles/index.xml
(you may need to log in with Princeton netID and
password). This is a semi-invisible page whose only function is as a
launch-pad for the profile creation process.
- Click the very small link 'Enter edit mode' at the
bottom of the page. You will probably need to log in at this point: do so.
- A new toolbar should have appeared across the top of the
website you are viewing. Click 'New' in the toolbar. In the box that
appears asking for a title, enter your Princeton University netID (the characters that go before
@princeton.edu in your email address). Do not consider entering anything
other than your netID in this box - that would
be a bad idea and would mess things up. Please make sure you have got
your netID right and do not include any spaces.
Click 'Next' in the toolbar. In the following step, click 'Create Page' in
the toolbar (do not alter the selected Page Stationary - leave it as it
is).
- Your profile is born. It lacks any real content and
even your name, and you need to provide these. Hover
your mouse over the text 'Replace with your name' on the page and look for
the little 'Edit' arrow. Click the edit arrow and you will be transported
to the 'Content Editor'.
- You will see your profile as seen in the Content
Editor, divided into the components 'Header' (which will be your name),
and a 'Text and Picture' component (which will contain everything else).
Your email address will be displayed automatically under your name/Header
using a piece of code whose function is to prevent it from being spammed.
You don't need to put your email address in your profile yourself. Please
don't alter the overall format of your profile page too much, such as by
using weird font sizes or styles, putting your picture in an odd place,
etc., as we want profiles to share a common format. Make changes within
the existing 'Header' and editable 'Text and Picture' components, as
described below.
- Currently, the 'Header' component is being edited.
Replace the 'Replace with your name' text with your name (naturally), and
click the little green check mark at the top right to save and close this
component.
- Open the 'Text and Picture' component by clicking 'Text
and Picture' in the left margin and start editing it. At the top, replace
the text it says to replace with the appropriate information. Your 'fields
of study' do not necessarily have to be the standard fields used on the
main page.
- Replace the paragraph below the "Profile"
heading with the paragraphs of information about your research interests,
dissertation project, biography, publications and so on that you want the
world to see. This will probably take a bit of effort to write, and you
can come back to it later if you wish.
- Again, to save changes in the 'Text and Picture'
component, be sure to click the little green check mark at the top right.
- To add a picture, first make sure you have one of the
proper size or it will completely mess up your
profile formatting. Around 200 to 250 pixels for the largest side is a
good rough guide. Resize the picture using image software and save it - or
you can try using an online tool such
as this one for the purpose. Once you have your picture, start editing
the 'Text and Picture' component, click 'Browse & Upload' in the
Picture section, and follow the instructions (tip: once you have uploaded
the picture, make sure you click on the small version of it that appears
in the upload popup window to use it in your profile).
- When you are done editing the profile, don't forget
to click 'Save Page' in the toolbar at the top.
- When you are finished with your profile and are happy
with it going live to external viewers, first check it over as you will not
be able to make immediate changes once this has gone for approval.
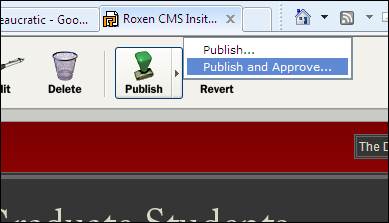
Once you’re ready, choose ‘Publish and Approve’ (see image below), after clicking the 'Publish' button in the toolbar at the top. You must choose ‘Publish and Approve’ rather than just ‘Publish’, otherwise the profile will not be visible to Laruen and Kristy. At the next prompt that appears, confirm by clicking 'Publish Page'.
- Once you have 'Publish-and-approved' your creation, it
will, in due course, be approved and a link activated to it in the main
lists of students. Before this, if you wish to view your profile or edit
it again, it is located at
https://deptbedit.princeton.edu/histgrads/profiles/yourNetID/, where
"yourNetID" needs to be replaced by
your Princeton netID, eg
https://deptbedit.princeton.edu/histgrads/profiles/aperson/ for the netID of aperson. Note that
you will only be able to ‘Publish-and-approve’ the profile again
after your previous submission has been processed. For editing an existing
profile, see the guidelines below.
Editing
an Existing Profile
- If your name is already hyperlinked in the lists of
students at https://deptbedit.princeton.edu/histgrads/,
simply click on your name there to go to your profile. Otherwise, point
your browser to https://deptbedit.princeton.edu/histgrads/profiles/yourNetID/,
where "yourNetID" needs to be replaced
by your Princeton netID (the characters before the @ in your email), eg
https://deptbedit.princeton.edu/histgrads/profiles/aperson/ for the netID of aperson.
- You should see the profile you previously created. If
not, check your browser is pointing at the right URL. Or, if you are
feeling brave, you can try finding it in Roxen's
Content Editor (see below, ‘What to do if you need to ‘commit’
your files’, for the Content Editor).
- When you are looking at your profile page, click the
'Enter Edit Mode' link at the bottom. Once in edit mode, to edit the page
in the Content Editor hover your mouse over the text until you see the
'Edit' arrow appear, then click the Edit arrow.
- You can then edit the profile using the same techniques
you used when creating it (for which see above).
- Don't forget to save every time you edit something.
- When you are ready for the profile to be submitted for
departmental approval and go live to external viewers, choose ‘Publish
and Approve’ (see image below), after clicking the 'Publish' button
in the toolbar at the top. You
must choose ‘Publish and Approve’
rather than just ‘Publish’, otherwise the profile will not be
visible to Laruen and Kristy. At the next prompt that appears,
confirm by clicking 'Publish Page'.
What to do if you
need to use the Content Editor to ‘commit’ your files (only do this
if something goes wrong, or if you need to commit a CV)
Sorry to expose you to the
complexities of Roxen, and thus the complexity of
some of these instructions. Unfortunately, this (for now) is the system we’re
stuck with.
For this, we need to use the ‘Content
Editor’, which allows you to manipulate the files in your profile folder
directly.
- Go to https://deptbedit.princeton.edu/histgrads/profiles/index.xml
, and click ‘enter edit more’ (you may need to log in).
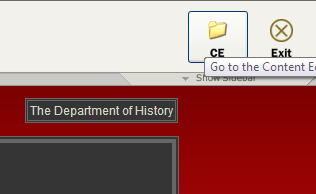
- Click the ‘CE’ folder icon at the top right,
as below:
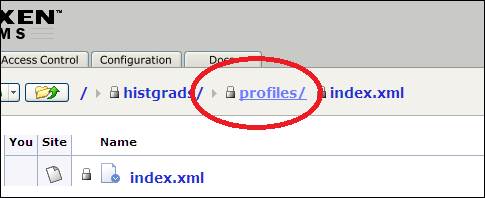
- You are now in the Content Editor. Click ‘profiles’,
as below, to go to the place where all the profiles are stored. Look for
the folder containing you profile in the big list: it will be named the
same as your Princeton net ID, or email address. Click it. If you can’t
find it, you never actually created a profile.
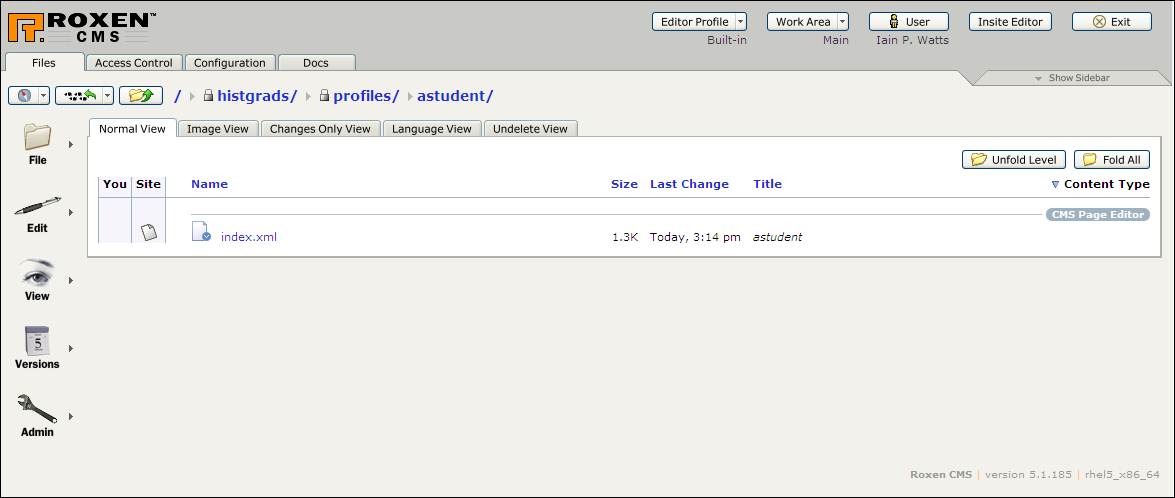
You should now be in your
folder, which should look something like this (it may differ in various ways, e.g.
if you have uploaded a picture, you will see that file):
You may wish or need to do
all, some, or none of the following:
1) If you need to upload a CV,
you can do that with (on the left hand menu bar) File->Upload New File. You
will then need to Commit the CV file (see below). Note
that you will still need to link to it by editing your profile main page in the
usual way described above; the link you’ll need to make will just the
filename of the CV, e.g. ‘johndoeCV.pdf’ (do not include any
http:// stuff in the link).
2) If you see the ![]() icon beside a file, it means it hasn’t
been committed (i.e., isn’t visible to anyone else). To commit all
uncommitted files, choose (on the left hand menu bar) Versions->Commit.
Enter your first name as a log message, and click Ok.
icon beside a file, it means it hasn’t
been committed (i.e., isn’t visible to anyone else). To commit all
uncommitted files, choose (on the left hand menu bar) Versions->Commit.
Enter your first name as a log message, and click Ok.
Once you have committed
files, you must ‘approve’
files for them to go to the next stage so they can be checked over and go live.
3) To
approve files (which you may need to do if something has gone wrong, e.g. if
you failed to click ‘publish and approve’ properly at some point, do this:
First, make sure all files
are committed, as above.
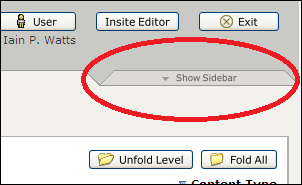
Then, click ‘Show
sidebar’ at the top right of the Content editor page, thus:
Look for the ‘My
Workflow Activities’ section. If there isn’t anything much there,
you don’t need to ‘Approve’ anything, and can exit the
Content Editor and get on with your day. If, on the other hand you see
something along the lines of:
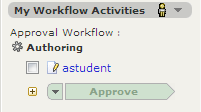
Then, click the checkbox (or all
checkboxes), and then click Approve.
You can exit the Content
Editor by clicking ‘Exit’ at the top right.
--Iain Watts (iwatts@princeton.edu), Spring 2011