What is RefWorks?
RefWorks is software that allows you to collect references for books, journal articles, videos, etc. into a personal database. From this database, you can use RefWorks to generate bibliographies in a variety of formats, including MLA, Chicago and APA. It will also insert formatted references into your papers. RefWorks allows you to…
- Import references from journal databases and catalogs.
- Organize and create a personal database of citations online. Everything is done automatically as you import the reference into RefWorks.
- Organize your references into folders according to your topics of interest or for particular assignments or projects.
- Insert references into the body of your research paper. These references will automatically be put into the format of your choice.
- Generate a formatted references page from your imported citations.
Setting Up Your Account: Princeton University has a site license to RefWorks. Any student, faculty or staff member may set up a personal RefWorks account. Please note: You will need to set up your account from on campus or while using a VPN connection to the Princeton University network. For more information about VPN, please see http://pulproxy.princeton.edu. Once you've successfully signed up for a RefWorks account, you can log in from off-campus using the "group code" for Princeton University. (This is listed on a password-protected web page; please ask the instructor for the link.)
To set up your account, go to the RefWorks homepage at http://www.refworks.com
Click on "User Login" on the right side of the top menu bar, then clickc on "sich up for an individual account" and fill out the form.
Once you've successfully signed up for a RefWorks account, you can log in from off-campus using the "group code" for Princeton University. (This is listed on a password-protected web page.)
It is not necessary to use your Princeton NETID and password as the account username and password. You can use any username and password that will be easy for you to remember. It is actually not advisable to use your Princeton password.
Getting Started
Once you've set up an account, you may choose to go through the tutorial provided by RefWorks, or you can jump right in: First, creat a new Folder by clicking on the FOLDERS pulldown and selecting "create new folder" from the menu. You may name this folder anything, but it is a good idea to name it something that will remind you of its contents. Once you've created a new folder, you're ready to start "populating" this folder with references. Let's start with the simplest scenario, which is bringing records DIRECTLY into RefWorks from Princeton's Main Catalog:
| Using RefWorks with the Main Catalog (http://catalog.princeton.edu/).
Method #1: You can search the main catalog directly via the RefWorks interface:
Search-->Online Catalog or Database-->find Princeton in the list.
This method is recommended after you've determined which records you wish to import into your RefWorks database, since the RefWorks interface is much less robust than the native interface to the main catalog. |
Method #2:
-
Mark relevant items and save them in the "Full record" format.
-
Display saved citation and choose File -->Save As. Save it to your hard drive or "H:" (\\smbserve\userid) drive as text.
-
Switch to RefWorks and import the citations using Import Filter/Data Source = Endeavor Voyager and Database = Princeton University Library (Full Record)
You may specify a folder or use the default "Last Imported" (NOTE: It is highly recommended that you create a new folder, since the "Last Imported" folder will be overwritten the next time you import records.)
-
Browse to find your saved file and click the "Import" button below the dialog box.
-
When you are ready to consult a work , choose "view" on the RefWorks and check the Notes field which will include the library location, call number. The status information will reflect a title's circulation availability at the moment you downloaded the record.
|
Each of the other "families" of databases provided by the library have slightly different instructions for bringing records into RefWorks. The following are instructions for our most heavily used databases:
Using RefWorks with CSA Databases
which include the following: (R efWorks works very easily with the CSA databases.)
ArtBibliographies Modern
Avery Index to Architectural Periodicals
Bibliography of the History of Art (BHA)
Linguistics & Language Behavior Abstracts
PAIS Archive
PAIS International
Pollution Abstracts
PsycInfoSocial Services Abstracts
Sociological Abstracts
Worldwide Political Science Abstracts
British Humanities Index
Communication Abstracts
ERIC
Index Islamicus
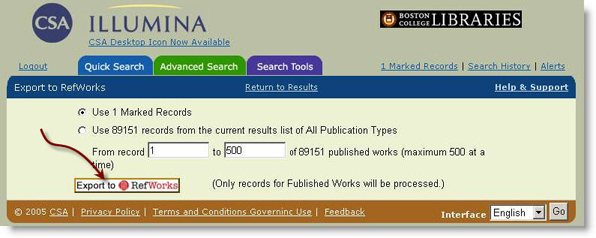
After searching the CSA databases, bring the references into RefWorks as follows:
- Select the references that you would like to import into RefWorks to be formatted into references
- Click on RefWorks
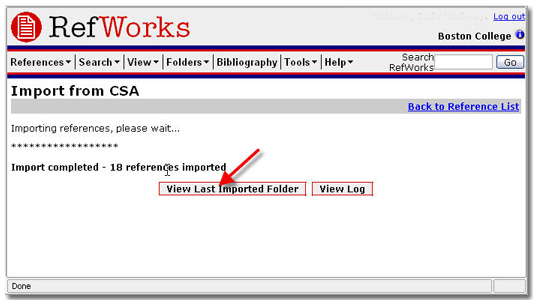
- You will be brought to another screen, click Export to RefWorks.
- Another screen will pop up and you will be brought into the RefWorks software.
- Click on View Last Imported Folder in order to see your results.

Using RefWorks with EBSCO databases
which include the following:
Academic Search Premier,
ATLA Religion Database with ATLA,
Serials Econlit Environmental Issues & Policy Index,
MLA International Bibliography,
MLA Directory of Periodicals,
Humanities International Index,
Military & Government Collection,
Catholic Periodical and Literature Index,
Global HealthCommunication & Mass Media,
CompleteAmerican Bibliography of Slavic and East European Studies,
Index to Jewish Periodicals,
GLBT Life with Full Text, Bibliography of Native North Americans,
SocINDEX with Full Text,
History Reference Center,
Humanities International Complete,
The Nation Archive
- Select citations to import into Refworks by clicking on the Add folder icon to the right of the citation.
- Once you have selected your citations, click on the folder has link above the citation list
- Select the Save to disk button.
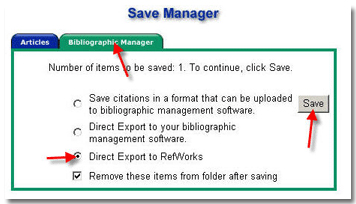
- At the Save Manager page, select the Bibliographic Manager tab.
- Choose Direct Export to RefWorks and click Save.
- The RefWorks Log In page will pop up in a separate window.
- Log in with your username and password.
- Your references will import automatically into the Last Imported Folder. You may now move them into the folder of your choice

Using RefWorks with Silverplatter databases,
which include the following:
Medline
CINAHL
Ageline
Drugs and Pharmacology
Education Abstracts
EMBASE
GeoRef
GPO
Library Literature
Mental Measurements Yearbook
Philosopher's Index
Social Work Abstracts
Sport Discus.
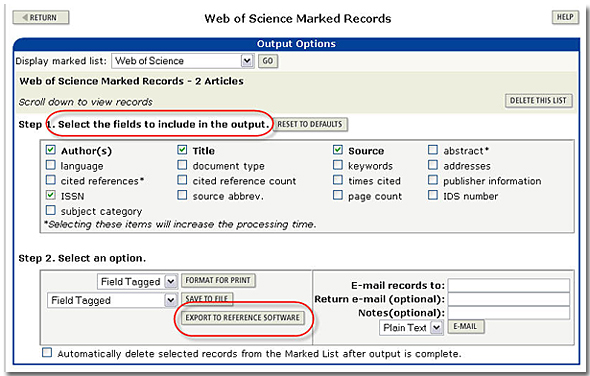
- Click on the disk icon
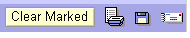 on the upper right hand corner of the screen to
save your marked records.
- Check Export to RefWorks then Okay.
- Log into RefWorks.
- You will be brought to the RefWorks software in a new window.
- Click on View Last Imported Folder in order to see your results.
Using RefWorks with WorldCat
WorldCat is a useful tool for locating books and other resources at other institutions besides Princeton University . To begin the process of getting WorldCat citations into RefWorks:
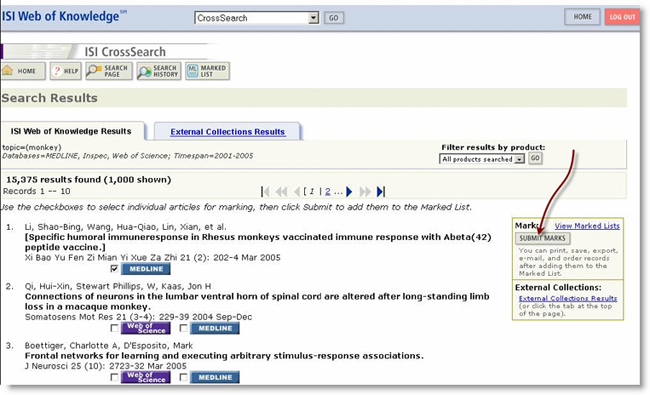
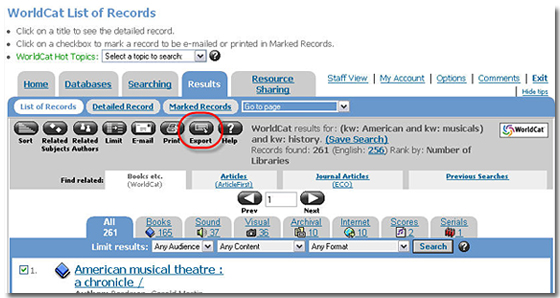
- Put a check mark next to the records you want to put into RefWorks.
- Select the Export button as circled in the screen below.
At the next screen:
- Under Export: select marked records from this search.
- Under Export to: select RefWorks
- Click on the Export button as circled in the screen below.
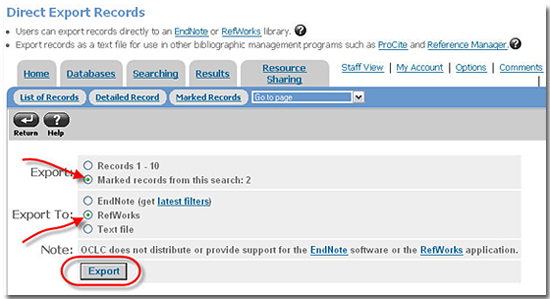
The RefWorks page will open. You will be asked to sign into your account and your citations from WorldCat will be imported.
Importing Records from EndNote
To import records from EndNote, you must first export them from EndNote:
- Select the correct Output Style for the export.
- Under the File Menu select Output Styles.
- Open the Style Manager and check the RefMan (RIS) Export format.
- Close the Style Manager and once again go to the File Menu, select Output Styles and select the RefMan format.
- Select the references you want to export and go to the Reference Menu and select Show Selected (or Show All if you wish to export the entire database).
- From the File Menu select Export and a window will appear for you to select the location where you want to save the file.
- Type in a file name and select a location you will remember for importing into RefWorks.
- Use Text as your Save As type and click on Save.
- Once you have exported your EndNote records:
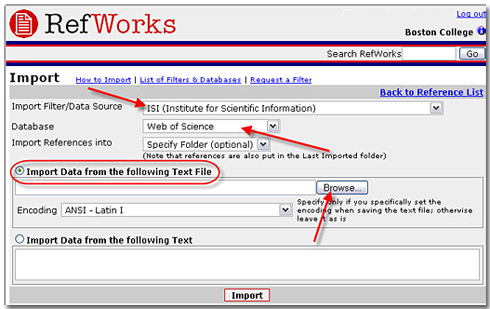
- Log in to RefWorks, go to the References Menu, and choose Import.
- Select Desktop Biblio. Mgt. Software as your Import Filter and EndNote as your Database.
- Browse for and select the file you just created from EndNote.
- Click on Import.
- During the import process, an asterisk (*) is added to the import progress page for each imported record. RefWorks will notify you when the import is complete.
Entering Records Manually
If you have citations in from a print bibliography in a journal article or book chapter, and you would like to add them to your list of references in RefWorks, you can type them in manually.
To enter references manually:
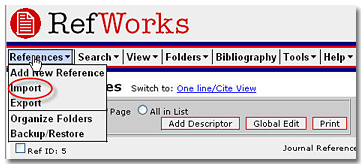
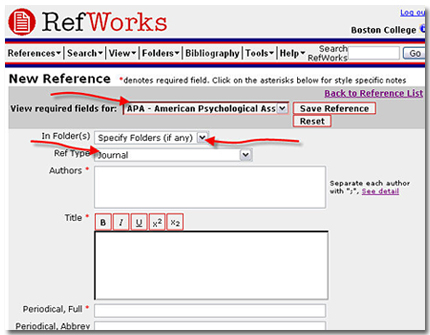
- Go to the References menu.
- Choose Add New Reference
- Use the pull down menu next to View required fields for: to choose a citation format.Specify the folder in which you would like the reference to appear (if any) using the In Folder(s) drop down menu.
- Choose the reference type (journal, book, etc.) in the Ref Type drop down menu.
- Fill out the fields as directed on the form. Fill in as much information as you have available.
Note: If you don't have all the information that is needed for the format you want to use, the reference will not appear correctly in your paper when you use the RefWorks formatting tools. You should verify any citation that you take from a print source by searching in RLIN or WorldCat for book citations, or in an online article database for journal citations.
Organizing References
Before you begin creating reference pages, it is helpful to organize your citations within RefWorks. This section of the tutorial will take you through the process of putting your imported citations into folders.
When you open up your account in RefWorks, you will see a list of citations that you previously imported.
If you are planning to import more citations on a different subject area into RefWorks, it is helpful to begin putting your citations into folders so that you can keep your references organized.
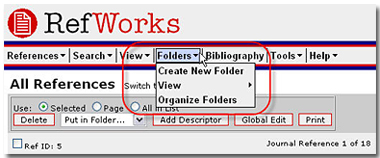
To create a folder:
- Go to the Folders menu.
- Choose Create New Folder
- Type in a name for the folder and click OK
- You will be brought to a listing of all the folders you have created.
To organize your folders:
- Go to the Folders menu.
- The organize folders button will bring you to a file of all folders that you have previously created.
- Choose Organize Folders
- You will be brought to a listing of all the folders you have created. From this screen, you can rename, delete, clear and create folders
To place references in a folder:
- Go to the View menu.
- Choose Folder and References Not in a Folder.
- A list of references not filed in a folder will appear.
- Select the references you would like to go into a folder.
- Select the folder you would like them to go into.
Refworks allows you to store and organize as many folders as you need to. In this way, RefWorks serves as a storage database and an organizer for your research. Creating folders allows you to easily generate reference lists, and we will cover this in the next section of the tutorial.
Creating Bibliographies
RefWorks will generate formatted bibliographies in a matter of seconds. It will format your bibliographies into many forms, including: APA, MLA, Chicago Style, Turabian, and more.
To create a bibliography:
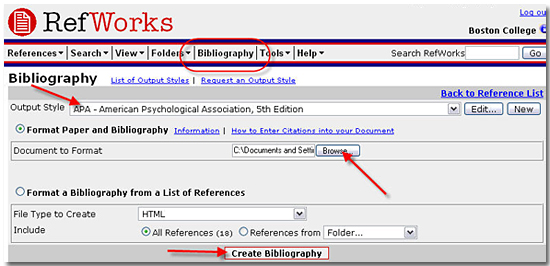
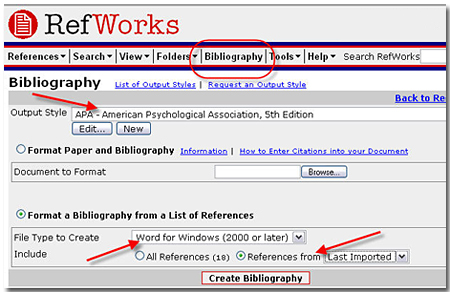
Click Bibliography on the bar at the top of the screen.
Select the reference style you would like to use from the output format menu highlighted below.
Select your file type to create. You can create a Word file, a file for a Mac, or an html file.
Select the folder that you want your bibliography created with. If you do not select a specific folder, RefWorks will generate a bibliography composed of all the references in every folder that you have created.
Click on Create Bibliography.
Save your reference list to your computer or floppy disk. You can attach this references page to the research paper that you are completing.
Using RefWorks with Write-N-Cite
The citations that you have stored into RefWorks can be easily inserted into the body of your paper if you use the Write-N-Cite feature. Please note: Write-N-Cite for Windows is only compatible with Microsoft Word 2000 and up, Windows 98 and up, and Internet Explorer 5.0. Write-N-Cite for Mac is only compatible with Microsoft Word 98 and up and Mac OS 10.3 and up.
To download Write-N-Cite:
- Go to the Write-N-Cite download page.
- Follow the installation instructions provided by the program.
- A Write-N-Cite icon will be added to your desktop for quick citation access.
To begin using Write-N-Cite:
After you download, you will always see a Write-N-Cite icon on the upper right hand corner of a Word document.
As you write your paper and come to a point where you want to insert a reference, click on the Write-N-Cite icon.
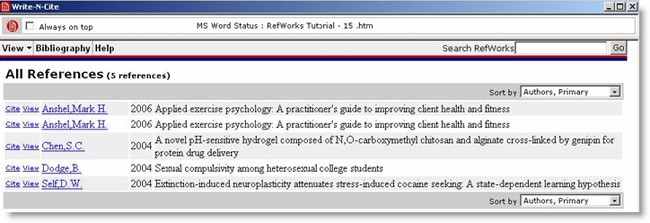
You will be brought into your RefWorks account, and you will see a list of all the citations that you have imported into the database as shown below.
To select the citation that you want to insert, you can scroll through your list of citations, do a quick search, or select a folder of citations that you want to work with. Shown below is a list of citations from a selected folder.
Simply click on cite, and the citation will be placed in the body of your paper
For FOOTNOTES, use the Microsoft Word footnote formatting feature, inserting references using the steps described above.
When you have finished, save and close your Word document.
Log in to RefWorks if you are not already logged in and click on Bibliography in the bar at the top of the screen
Select the Output Style (e.g. MLA, Chicago Style Manual, ACS Journals, etc).
Select Format Paper and Bibliography.
Browse to locate your paper.
Click on Create Bibliography button.
A new window will open with the re-formatted Word manuscript containing the bibliography. Note: the file name is the same as your original Word document except "Final" has been inserted in front of the file name.
Save and retain both versions of your Word document. If you need to revise your manuscript later, you must do it using the original document, not the final saved version