Rick Curtis - Tutorial 7
Database-driven Navigation Bars Using Text & Images
Okay, we've all fiddled with NavBars. In fact, MM's built-in Navigation Bar Builder is pretty sweet for creating NavBars with onMouseOver and onMouseOut behaviors giving your site that professional look. But what if your site changes frequently? One option is to bag the images and stick with a database-driven NavBar that uses a repeat region. We'll look at that approach first. Then we will see how we can replace UltraDev's hardcoded NavBar image behaviors with database-driven links and images.
| As in my other tutorials I am working with SQL Server 7. There may be a few changes for Access or other databases. |
The Table of Contents Database
Here is the basic database table to create your Table of Contents for the NavBar. The basic site design here has articles in an Article folder and images in an Images folder.
| Field Name | Datatype SQL Server 7 | Datatype Access 97/2000 | Description |
| PageID | Autonumber | Autonumber | Primary key |
| Page | varchar(50) | text | Page Title |
| URL | varchar(50) | text | Relative link |
| Image1 | varchar(50) | text | Up Image location |
| Image2 | varchar(50) | text | Down Image location |
| Active | Bit | Yes/No | Sets whether to show this Page in the Table of Contents |
Sample Data
You'll notice that the links in the database are all set in relation to the site root.
| Field Name | Sample |
| PageID | 1 |
| Page | Articles |
| URL | ../articles/default.asp |
| Image1 | ../images/articles1.gif |
| Image2 | ../images/articles1_f2.gif |
Creating the Table of Contents NavBar
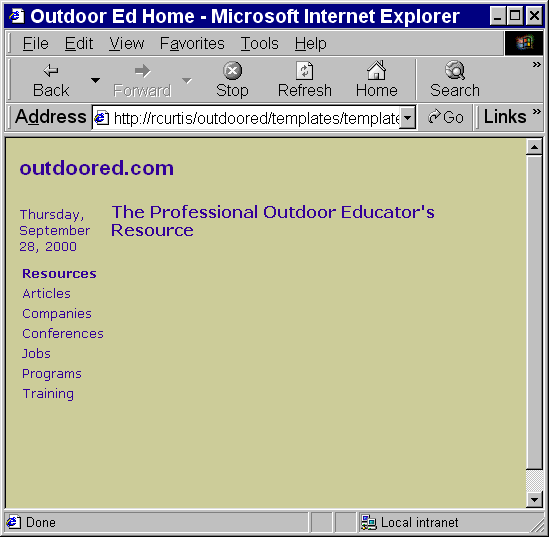
Here is a sample of what our page will look like when it is finished.
I'll leave it to you to create the basic page layout. Now we get into the nitty-gritty.
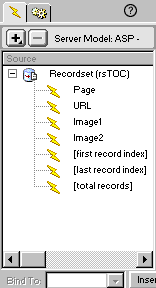
1. Create a Recordset using the Data Bindings Server Behavior. In this case I used a Stored Procedure in SQL 7 (which is documented at the bottom of the page). I called the recordset rsTOC for Table of Contents.
2. In the left-hand column insert a new table with one column and one
row. Drag the Page recordset object
(rsTOC.Fields.Item("Page").Value)into
that row.
3. Set this row as a Repeat Region using the Server Behaviors and "Show All Records."
4. Now since this only displays the name of the Link, we need to make this link active to the actual URL. Here you need to go into the code and make some edits by hand. Here is the code:
<a href ="<%
=(rsTOC.Fields.Item("URL").Value)%>" style="text-decoration:none"><%=(rsTOC.Fields.Item("Page").Value)%>
</a>
<a href ="<%=(rsTOC.Fields.Item("URL").Value)%>"</a></font>
This creates Dynamic Link to the URL of the particular item in the Table of Contents and shows the displayed value as the Page from your recordset. You will now see a Dynamic Link in the Server Behaviors box.
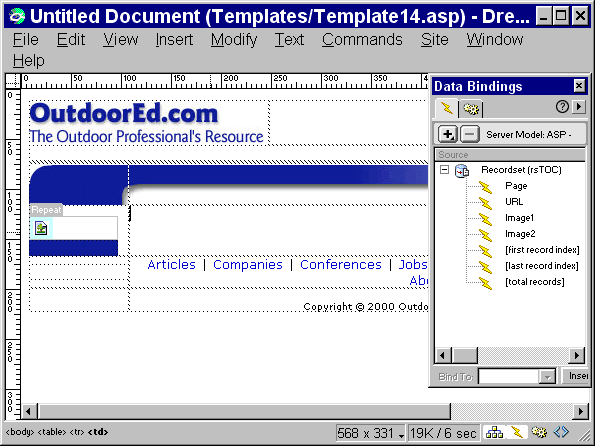
Let's take a look at how the page looks in design mode in UltraDev.
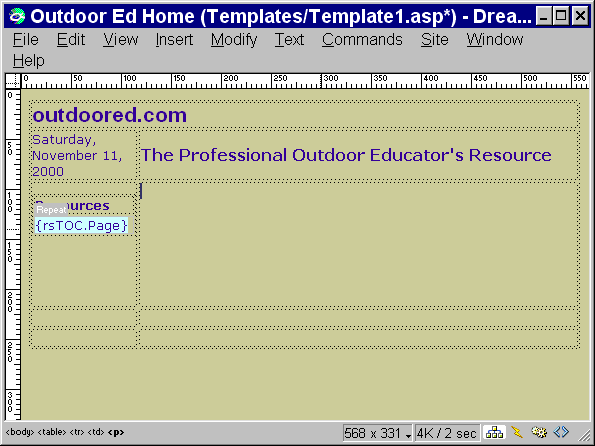
The screen shot from Figure 1 shows the page with Live Data Preview and approximates how it will look in the browser. That's all there is to it. The beauty of this is as you add new items all you need to do is add the requisite entry in your database table, set the new entry Active field to True and it will show up in all Tables of Contents on your site. Need to take something out? Simply set the Active field to False.
NavBar with Images
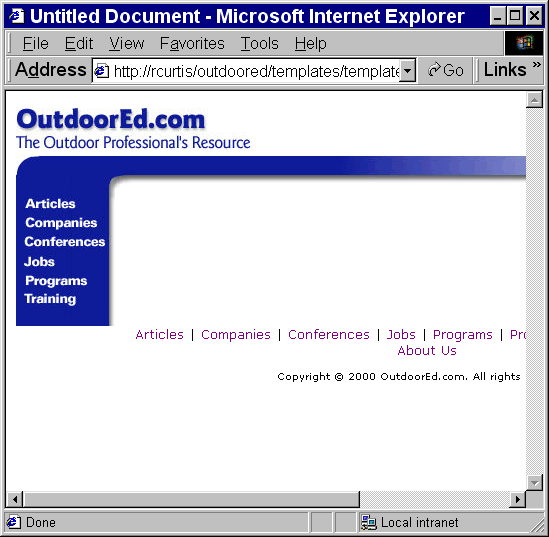
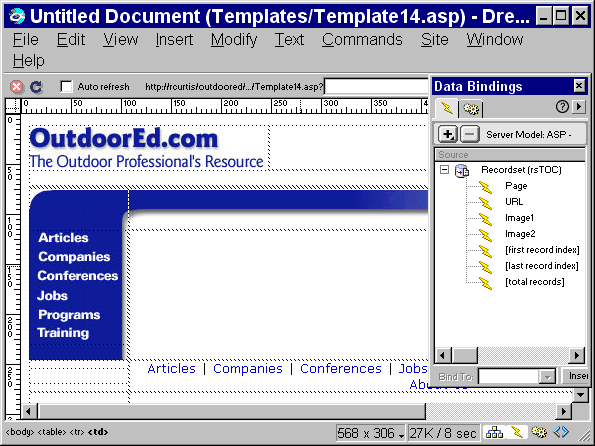
Ready for part 2? Text links are OK but what about all those great graphics and buttons you spent hours creating? Now you can use them alongside your dynamic database driven links. We are going to take what we used above and some UltraDev generated code to create our image driven NavBar. I'll leave it to you to create the table and place the appropriate images for the logo. That is accomplished by placing a table at the top of the page and inserting graphics done in Fireworks. Here's what our final product will look like.
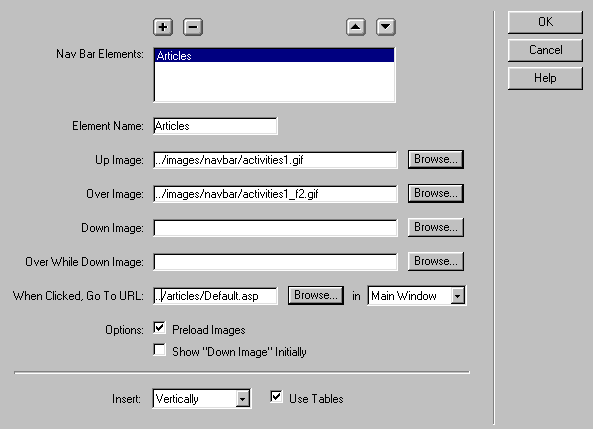
In order to create the proper code, generate your own Navigation Bar through UltraDev. The NavBar Dialog Box will guide you through the process of creating image-based links with different states (Up, Over, etc.). Save that page, and then modify the code. You will only need to have one image button with the correct up/down etc. states in order to create the code you need. As long as all of your images are the same size, this should work fine. Here is the NavBar Dialog box.
Let's look at the three pieces of code that UltraDev creates to manage the Navigation Bar. This first section of code is client-side Javascript that sets up image swapping for the NavBar. This code appears in the header above the <html> tag. Don't change any of this code just copy and paste it into your new NavBar.ASP page. If you want, you can even place the in an Include file to insert it into your page. Don't copy the code below, just in case I missed something in transcribing it.
<Script language="JavaScript">
<!--
function MM_preloadImages() { //v3.0
var d=document; if(d.images){ if(!d.MM_p) d.MM_p=new Array();
var i,j=d.MM_p.length,a=MM_preloadImages.arguments; for(i=0; i<a.length;
i++)
if (a[i].indexOf("#")!=0){ d.MM_p[j]=new Image; d.MM_p[j++].src=a[i];}}
}
function MM_findObj(n, d) { //v3.0
var p,i,x; if(!d) d=document; if((p=n.indexOf("?"))@0&&parent.frames.length)
{
d=parent.frames[n.substring(p+1)].document; n=n.substring(0,p);}
if(!(x=d[n])&&d.all) x=d.all[n]; for (i=0;!x&&i<d.forms.length;i++)
x=d.forms[i][n];
for(i=0;!x&&d.layers&&i<d.layers.length;i++) x=MM_findObj(n,d.layers[i].document);
return x;
}
function MM_nbGroup(event, grpName) { //v3.0
var i,img,nbArr,args=MM_nbGroup.arguments;
if (event == "init" && args.length > 2) {
if ((img = MM_findObj(args[2])) != null && !img.MM_init) {
img.MM_init = true; img.MM_up = args[3]; img.MM_dn
= img.src;
if ((nbArr = document[grpName]) == null) nbArr
= document[grpName] = new Array();
nbArr[nbArr.length] = img;
for (i=4; i < args.length-1; i+=2) if ((img = MM_findObj(args[i]))
!= null) {
if (!img.MM_up) img.MM_up = img.src;
img.src = img.MM_dn = args[i+1];
nbArr[nbArr.length] = img;
} }
} else if (event == "over") {
document.MM_nbOver = nbArr = new Array();
for (i=1; i < args.length-1; i+=3) if ((img = MM_findObj(args[i]))
!= null) {
if (!img.MM_up) img.MM_up = img.src;
img.src = (img.MM_dn && args[i+2]) ? args[i+2] : args[i+1];
nbArr[nbArr.length] = img;
}
} else if (event == "out" ) {
for (i=0; i < document.MM_nbOver.length; i++) {
img = document.MM_nbOver[i]; img.src = (img.MM_dn) ? img.MM_dn : img.MM_up;
}
} else if (event == "down") {
if ((nbArr = document[grpName]) != null)
for (i=0; i < nbArr.length; i++) { img=nbArr[i]; img.src = img.MM_up;
img.MM_dn = 0; }
document[grpName] = nbArr = new Array();
for (i=2; i < args.length-1; i+=2) if ((img = MM_findObj(args[i]))
!= null) {
if (!img.MM_up) img.MM_up = img.src;
img.src = img.MM_dn = args[i+1];
nbArr[nbArr.length] = img;
} }
}
//-->
</script>
The second piece of code comes in the <Body> tag and simply preloads the images so that the image swaps happen seemlessly. This is inserted if you check the Preload Images box in the Navigation Bar Dialog Box.
<body bgcolor="#FFFFFF" onLoad="MM_preloadImages('../images/articles1_f2.jpg'),'../images/oehome1_f2.jpg')">
Now this code line only shows two images (the over images) which are being preloaded. If you have lots of images to preload, they all need to be included in this string in the same format and must be all on one line even if it stretches forever. UltraDev does this automatically if you check Preload images in the dialog box. This code does present a little problem for a database-driven NavBar. Since the image list comes as part of an onLoad command within the body tag, there isn't a way I could find to generate it dynamically from the recordset. Your options are either to uncheck the Preload images (which could mean a log for image swaps) or create the list to include every possible image for your NavBar (either through the dialog box or manually). Since most of these images are really small GIF's or JPG's (and it is unlikely you will have a NavBar with 100's of entries) this should be OK. It shouldn't be a problem to preload a tiny image you don't need.
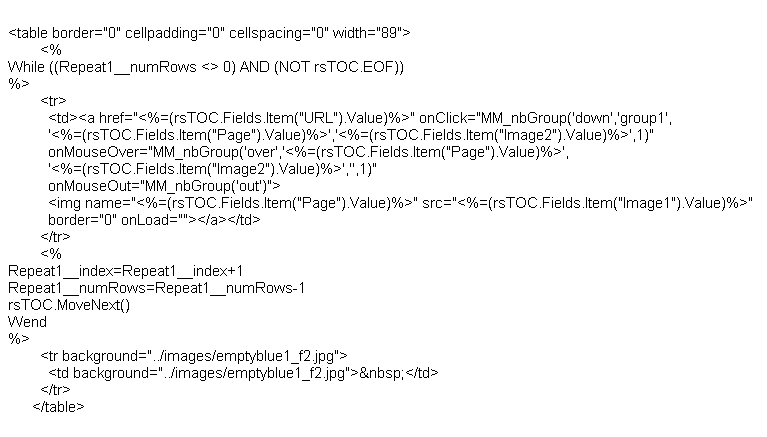
The third piece of code is the what I call the NavBar action code, generated by UltraDev. This is the code that actually initiates your link. Let's take a look. You can see that the codes creates a link to the page, and sets up the onMouseOver an onMouseOut behaviors with the proper images. I have marked some code in blue. That's the hardcoded info that we are going to replace with our recordset code.
<a href="../articles/default.asp" onClick="MM_nbGroup('down','group1','Articles','../images/articles1_f2.jpg',1)" onMouseOver="MM_nbGroup('over','Articles','../images/articles1_f2.jpg','',1)" onMouseOut="MM_nbGroup('out')"><img name="Articles" src="../images/articles1.jpg" border="0" onLoad="" width="99" height="19"></a>
Now it's time to add the database components.
1. You need to add the same rsTOC to this new ASP page as you did above.
2. Like above insert a one column by one row table and set it as a repeat region. Do not insert any field values from the recordset into the table.
3. Copy the NavBar action code into that table.
4. Now we are going to hand code values from the recordset into the UltraDev NavBar Behavior in the repeat region. Replace the hardcoded values in blue above with the corresponding values from the recordset.
<a href="<%=(rsTOC.Fields.Item("URL").Value)%>" onClick="MM_nbGroup('down','group1','<%=(rsTOC.Fields.Item("Page").Value)%>','<%=(rsTOC.Fields.Item("Image2").Value)%>',1)" onMouseOver="MM_nbGroup('over','<%=(rsTOC.Fields.Item("Page").Value)%>','<%=(rsTOC.Fields.Item("Image2").Value)%>','',1)" onMouseOut="MM_nbGroup('out')"><img name="Articles" src="<%=(rsTOC.Fields.Item("Image1").Value)%>" border="0" onLoad="" width="99" height="19"></a>
Your final code will look something like this.
What you have just done is set up a dynamic image-based NavBar. Like above, adding new items to the database and new images will let you extend the NavBar. Want to take something out even temporarily, just set Active to False in the database. I made a few additional tweaks to my design. Since I wanted the background color to extend a little bit below the last image link, I added another row to the table below the repeat region. I have an image called emptyblue1_f2.jpg which is the same as the other images with no text. Setting this as the background image for that botton row gives me a little bit of extension to the NavBar. You can see this effect above. Just to prove that all of this isn't an illusion, check out the page in UltraDev in Design View and Live Data Preview.
I hope this is helpful to people. Happy coding.
Rick Curtis
Here is the stored procedure code:
Alter Procedure spTOC
As
set nocount on
SELECT Page, URL, Image1, Image2
FROM WebTOC
WHERE Active = 1
ORDER BY Page
return
Macromedia and UltraDev are trademarks of the Macromedia Corporation.