
Saturday May 30, 2026
Outdoor Action Guide to Belaying
by Rick Curtis
Rock Climbing is an inherently dangerous activity. The information provided here is designed for educational use only and is not a substitute for specific training or experience. Princeton University and the author assume no liability for any individual's use of or reliance upon any material contained or referenced herein. The material contained in this article may not be the most current. Copyright © 1999 Rick Curtis, Outdoor Action Program, Princeton University.
Navigation
- How to Belay - Adobe Acrobat version (134K)
- Adobe Acrobat Reader - free for downloading
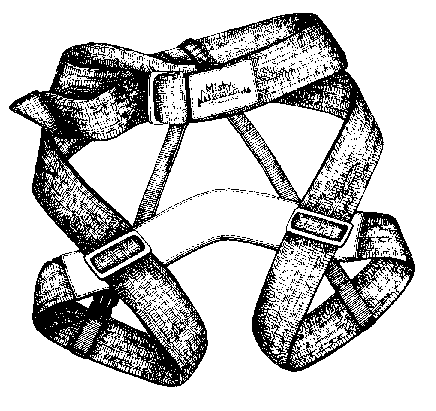
Putting on the Harness
- First, orient the harness so that the leg loops hang down with the slider buckles facing forward and the long tails point upward out of the slider buckles.
- Step into the leg loops and adjust them to a snug fit around the thighs by passing the webbing through the slider buckles.
- Wrap the remaining tails around the waist, as many times as possible. Be sure to begin with tight wraps, and to wrap behind the back first (i.e. do not cross in front of the waist on the initial wrap).
- Feed the remaining tail through the main buckle. Be sure to leave enough tail to pass back through the buckle on the side in which you first inserted the webbing. The newer harnesses are equipped with the Red Alert buckle system. When buckling, always pass the webbing back through the buckle so that the red bar of the buckle is covered, leaving at least 2" of tail webbing. The buckle is not designed to be used without this step.
- Pass the leg loop hold up strap through the waist loops and buckle on the opposite leg. Snug the strap to prevent the leg loops from dangling.
- When tieing in with a rope, use a Figure 8 Follow-through; it is important to go through the crotch strap and all the waist straps.
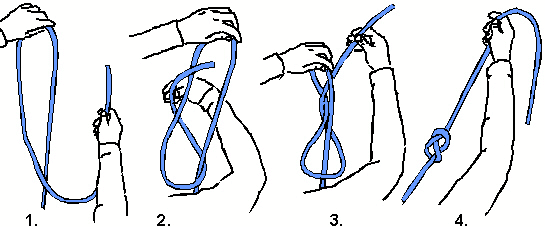
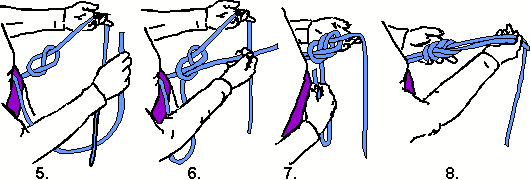
How to Tie-in to a Climbing Harness
One of the most important safety procedures that one can do before climbing is tying into the rope and anchor system properly. The knot that is most commonly used for tying into a harness is the Figure 8 Follow-through (or rewoven Figure 8). The Figure 8 Follow-through has a variety of advantages over other knots, as it is easy to tie, strong enough to hold the forces generated by a fall, and is relatively easy to untie after it has been loaded by a fall.
- To tie into a harness with a Figure 8 Follow-through, tie a Figure 8 knot in the rope approximately 3 - 3.5 feet (1 - 1.5 meters) from the end of the rope (Figures 1 - 4)
- Feed the running end of the rope through both the crotch loop on the harness (the one joining the two leg loops) and the waist loop of the harness.
- Feed the end of the rope back through the existing Figure 8 knot (follow the Figure 8
back through), starting at the end closest to the harness and finishing up with the live
end of the rope (Figures 5 -8). Make sure the
knot be properly "dressed;" the Follow-through should always maintain the same relative position to the original Figure 8. (in other words the original and the Follow-through eights do not overlap or cross.) - Make sure that there is at least 3 inches of tail leaving the knot. Tie off the extra tail of rope to the live end of the rope using several overhand knots or a double fisherman's knot.
Setting up an ATC for Belaying
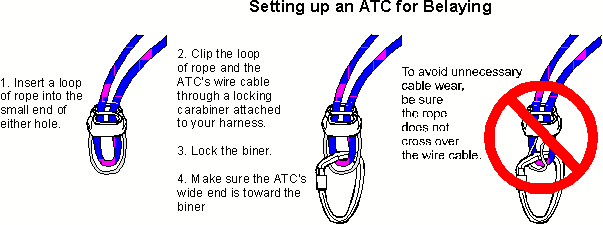
- Clip a locking carabiner through both the groin loop and the waist loops of your harness (the same loops you tie into).
- Take a loop (bight) of rope from the end which the climber is not tied into and pass it through one of the two slots in the ATC (both slots are identical).
- Clip both the wire cable on the ATC and the bight of rope into the locking carabiner, and screw the gate of the carabiner shut.
- Clip a second carabiner into your harness at the waist and groin loops on the side opposite your braking hand. Clip this carabiner into one of the pre-tied loops on the anchor ropes attached to the floor at a point which offers the least slack in the anchor rope. This prevents the belayer (you) from being pulled off the floor in the event the climber takes a fall (or if the climber weighs more than you do).
Final Check Before Climbing
Once both climber and belayer are tied in and set up, stop and both partners should check the setup. Make sure of the following:
- All harness buckles are doubled back.
- All knots are properly tied and dressed.
- All carabiners are properly aligned, and screwed shut.
- The belayer is clipped into the floor anchor on the side opposite the brake hand.
How to Belay
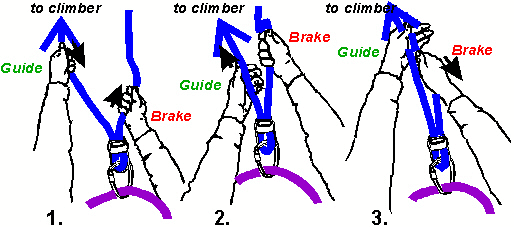
Belaying itself is relatively simple provided one is always paying attention to your climbing partner. The end of the rope which passes through the top-rope anchor and goes back down to the climber is called the "live" end of the rope. The "live" end is handled by the "guide" hand. The other end of the rope is the "brake" end which is handled by the "brake" hand. You must always have at least one hand on the brake end of the rope at all times. If you don't, and the climber begins to fall, you will not be able to regain control of the rope, and the climber may be injured. As the climber proceeds up the wall, it is the belayer's job to take up the rope and make sure there is no slack in the system. This limits the distance the climber can fall. Make sure both hands never leave the rope!
- With both hands firmly on the rope, the guide hand pulls the rope towards the ATC as the brake hand pulls rope out and away from the ATC (Figure 1).
- When the guide hand reaches the ATC, hold the rope fast with the brake hand, while sliding the guide hand up the live end of the rope until it is above the brake hand (Figure 2).
- The guide hand now grasps both ends of the rope and pinches both off with the thumb while the brake hand slides back down the rope to the ATC. The hands are now back in position to repeat step 1 (Figure 3). The brake hand never leaves the rope!
Taking Rope In (as the climber ascends)
Letting Rope Out (when the climber needs slack)
- With both hands firmly on the rope, the guide hand shuffles the rope away from the ATC (Figure 4 - 5).
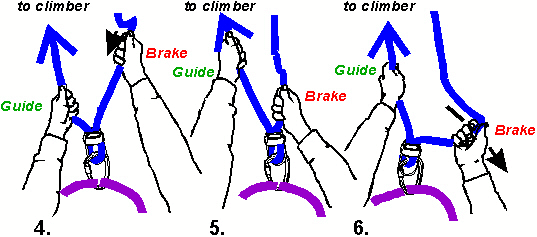
Locking Off the Rope
Locking off is to keep more rope from paying out if the climber is falling, or if you need to hold tension on the rope (for example while a climber rests).
- Using the brake hand, bend the rope across the ATC. This collapses the ATC onto the locking carabiner and locks the rope off (Figure 6).
Climbing Calls
These calls are designed to be easy to remember. The basic sequence goes 4, 3, 2, 1 in decreasing number of syllables. There is a paired response from the climber to her belayer at each point. The particular words are important because when it is hard to hear, the intonation and order of the syllables may help distinguish which call is beginning given.
| Climber Says | Which Means | Belayer Says | Which Means |
|---|---|---|---|
| "Ready to Climb" (4) | = I'm ready | "On Belay" (3) | = I have you on belay |
| "Climbing" (2) | = I'm starting to climb | "Climb" (1) | = Go ahead |
Other Climbing Calls |
|||
| Climber Says | Which Means | Belayer Says | Which Means |
| "Slack" | = I need extra rope | "Thank You" | = Received |
| "Up Rope" | = I have too much slack | "Thank You" | = Received |
| "That's Me" | = The slack is gone | "Thank You" | = Received |
| "Falling" | = I'm going to fall | " | = Usually no need to respond verbally |
| "Belay Off" | = Request after reaching the top | "Belay off" | = You are no longer on belay |
Bibliography
- Fudge Harness graphic - from Misty Mountain Threadworks product information
- Information on ATC use from Black Diamond product information.
- ATC graphic- redrawn from Black Diamond instructions
- Figure 8 Follow through description adapted from Gym Climbing, John Long, Chockstone Press, 1994.
- Figure 8 Follow through graphic based on graphics from Gym Climbing, John Long, Chockstone Press, 1994.
- Belaying description adapted from Gym Climbing, John Long, Chockstone Press, 1994.
- Belaying graphic based on graphics from from Gym Climbing, John Long, Chockstone Press, 1994.
